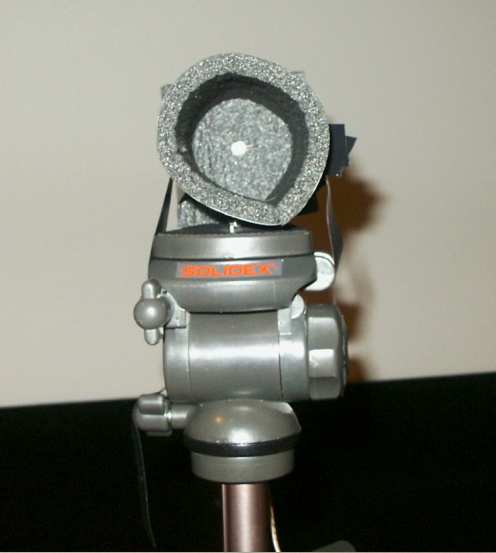
Detector used to measure projectors response to changing inputs
This page details the method I used to optimize the gamma tracking of my projector. The basic idea came from Steve Smallcombe's VPL-VW10HT page. If you want to try this and don't want to build your own detector, they are available from EnhancedHT.
What is Gamma?
In an ideal world; when a display device (like a TV or projector) is given an input signal of a given level, say 1/2 of the maximum value, the display would then produce an image that was 1/2 of the maximum picture intensity. This would be a nice linear relationship. Input a value of 1/4, get 1/4 out.
Unfortunately CRT display devices like TV sets and computer monitors do not exhibit this. Instead there is a non-linear relationship between the input and output. This relationship is described by a power function where the exponent is the gamma of the display. To compensate for this, video cameras and video transfer operators add the inverse of this gamma function to make everything come out nice in the end. The gamma used in video production is 2.2. (Output = Input ^ 2.2, approximately)
If a display device does not have the proper gamma response, the picture will be less than satisfactory. If the gamma is too low, the picture will have to much contrast and will loose detail. If it is too high, the picture will be washed out.
LCD projectors do not have an inherent gamma response like CRT's, so they must be designed and set up correctly to mimic the proper gamma curve.
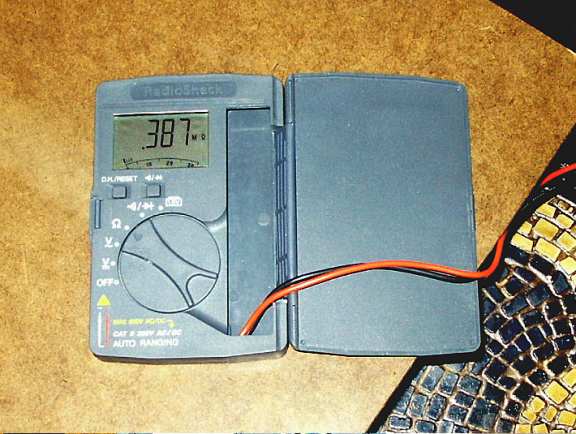
Digital Multimeter measures changes in photocell relative to the incident light level
Complete detector, made of a piece of rolled black foam and electrical tape with photocell mounted at back.
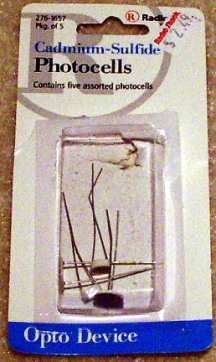
Photocell used. Radio Shack part 276-1657, 5 Piece assortment. I used one of the smaller photocells. Photocells are really just light sensitive resistors. As the level of incident light increases, photocell resistance decreases. Photcells have a non-linear response to light. The cell I used had a gamma of 0.7.
Using the Do-It-Yourself (DIY) detector and digital multimeter described above, and the graduated IRE windows on Title 17 of Video Essentials, I measured the projector's response to each input level. You can also use the Avia test DVD.
Tests were done with the CC40R color correcting filter in place.
What is IRE? IRE units are the scale defined by the Institute of Radio Engineers to measure the amplitude of a video signal. 0 IRE is black, and 100 IRE is white.
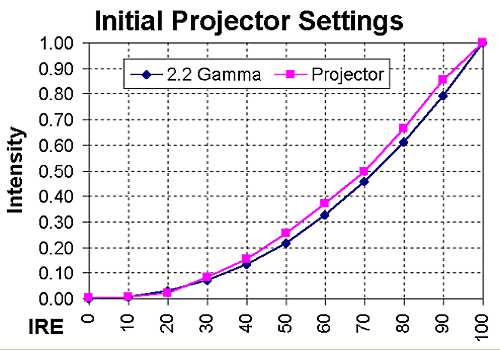
Intial Results:
The Inital Projector Settings Plot shows an ideal 2.2 Gamma curve (in blue with diamonds) and the projectors actual curve (in pink with squares).
What does this tell us? The overall shape is close, but the gamma level is too high, this means that the picture will look a bit washed out. Details in bright scenes may be lost. Also note the dogleg turn at about 90 IRE, this suggests that one or more colors (Red, Green or Blue) may be overdriven and its output is flattening out before 100 IRE (brightest white) is reached.
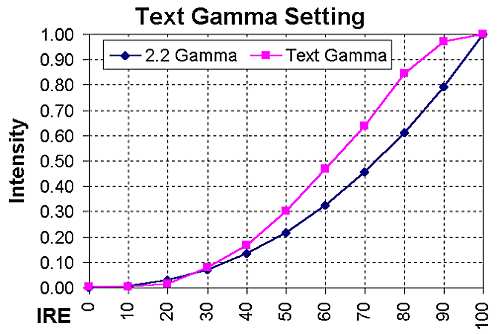
Gamma Curve Comparison:
Just for fun and to see if the methodology used would detect the difference; I repeated the measurements with the the projector's alternate gamma setting. This setting is intended for use when displaying text for presentations, so I didn't expect much.
As you can see by the radical departure from the 2.2 Gamma response, this setting stinks for video. Watching some test footage proved this. Details in light scenes were crushed out of existence, overall dark scenes were mostly okay, but sunlit scenes looked washed out and dull.
*Note to self: DO NOT USE THIS SETTING!! EVER!
Adjustments and Validation
To improve on the gamma response found in the first plot; I reset the Theater Tek DVD player video adjustments to their default state. The Theater Tek default video settings are supposed to correspond to a scoped 0-700mV output on the Radeon graphics card in the HTPC.
After resetting the defaults, I used Video Essentials to adjust the brightness and contrast on the projector the best that I could. I ended up needing to adjust the Theater Tek player's contrast down a bit in order to be able to properly adjust the brightness on the projector (the projector was clipping the input). This costs a bit of headroom, but I couldn't find another way to do it.
I also adjusted the color bias and gain using the service menu and the program drive level for the LCD panels a bit also. If you really want to know the gory details of what was done, look here.
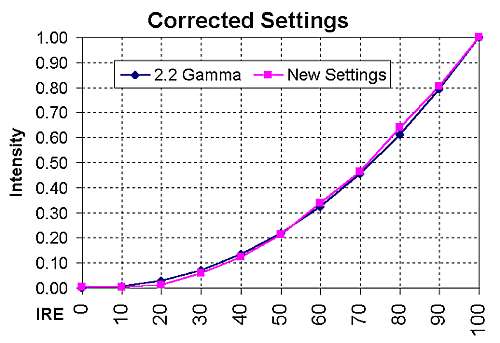
Conclusions:
The results can be seen in the Corrected Settings plot. Really tracks nicely. The visual results are also easy to see. The overall picture level seems lower but the contrast is still there and the black level seems improved. The highlights on peoples faces seem smoother, less stark, more natural.
The combined results of the filter and calibration pleases me greatly. With the improvements in black level, color rendition, and resulting improvments in picture depth it's like getting a new projector.